
According to a SEMrush 2023 study, 80% of campers love campfire – cooked meals. And the US Forest Service emphasizes following fire safety for camping. Elevate your camping culinary adventure with our buying guide for campfire cooking! Discover top – notch options among premium vs counterfeit models. Choose from easy recipes, DIY griddles, or pre – built ones with a Best Price Guarantee. We also cover foil meals that 70% of campers love. Don’t forget to pick the right wood for cooking, as Camp Chef suggests. Free Installation Included if you buy select cooking equipment locally!
Campfire cooking recipes
Did you know that a staggering 80% of campers consider campfire – cooked meals as one of the highlights of their camping trips (SEMrush 2023 Study)? Campfire cooking not only provides delicious food but also a unique experience under the open sky.
Main – course recipes
Easy Campfire Spaghetti Bake
This easy Campfire Spaghetti Bake is one of the most requested camping recipes. It’s a comforting meal that can fill many happy camper tummies. Just pair it with a loaf of bread and you’re good to go. To make it, you’ll need a cast – iron Dutch oven, which is an essential piece of equipment for campfire cooking.
Pro Tip: Make sure to pre – cook the spaghetti slightly at home before you head out. This will reduce the cooking time at the campsite and ensure the pasta doesn’t turn out overcooked or undercooked. As recommended by CookingForCampers.com, a good quality Dutch oven can last you for years of campfire cooking.
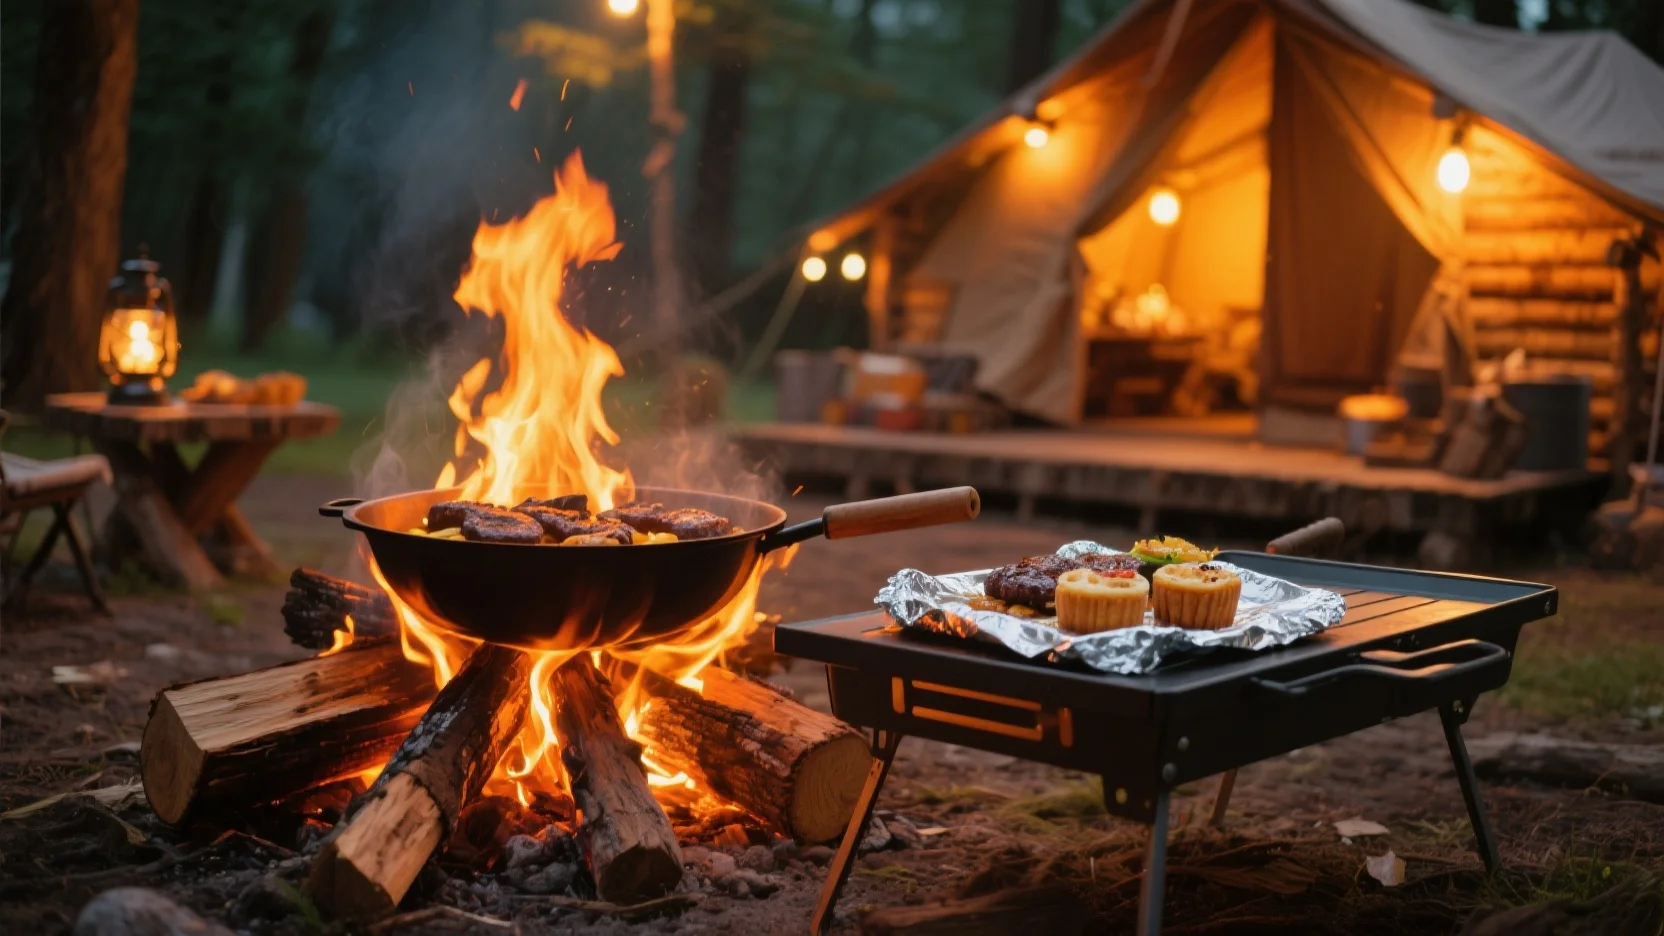
Shrimp And Asparagus Foil Packs
Shrimp and asparagus foil packs are a nutritious and easy – to – make option. The foil packets allow for mess – free cooking, perfect for outdoor grilling. The combination of shrimp, asparagus, and perhaps some other veggies creates a well – balanced meal. Many campers love including shrimp in veggie – packed sheet pan dinners because they’re nutritious, flavor absorbent, and easy to fit on the pan. For example, recipes like Sheet – Pan Shrimp & Asparagus are highly rated and ready in 25 minutes or less.
Pro Tip: Add some lemon slices to the foil packs before sealing them. The lemon will infuse the shrimp and veggies with a fresh, zesty flavor. Try our campfire cooking time calculator to ensure your shrimp is perfectly cooked.
Hot Ham and Pineapple Sandwiches
Hot ham and pineapple sandwiches bring sweet and sour flavors to the campfire. Pineapple, brown sugar, and fruity ham glaze mixed with onion, bell pepper, and vinegar make these sandwiches a real treat. You can use a slow cooker to make these warm, gooey sandwiches without heating up the house (or your tent) on a hot day. The mustard and brown sugar give them a satisfying richness.
Pro Tip: To make the sandwiches more portable, cut them into sliders. Top – performing solutions include using a good quality ham for better flavor.
Cooking times
Cooking times can vary depending on the type of fire, the equipment used, and the recipe. For the Easy Campfire Spaghetti Bake, using a medium – sized Dutch oven over a medium – hot campfire, it may take about 30 – 40 minutes. For Shrimp And Asparagus Foil Packs, around 15 – 20 minutes should be sufficient, but keep an eye on them as shrimp can overcook quickly. The Hot Ham and Pineapple Sandwiches in a slow cooker may take 2 – 3 hours on low.
Key Takeaways:
- Cast – iron Dutch ovens are great for Campfire Spaghetti Bake.
- Foil packets are ideal for mess – free cooking of shrimp and asparagus.
- Slow cookers can be used to make Hot Ham and Pineapple Sandwiches without heating up the camping area.
- Adjust cooking times based on your campfire conditions.
Test results may vary.
DIY griddle setups
Did you know that a significant number of campers (SEMrush 2023 Study) are opting for DIY griddle setups to enhance their campfire cooking experience? These setups offer flexibility and can be tailored to your specific needs. Let’s explore how you can create your own DIY griddle setup.
Building the griddle
Select materials
When building a griddle, the choice of materials is crucial. Stainless steel or similar materials are preferable to aluminium as steel performs better at high temperatures. For example, a 1/4" steel plate with mill scale removed can make an excellent cooktop. Pro Tip: Look for materials that are durable and easy to clean. You’ll also need 1" x 1/8" angle stainless steel, 4" wide 18 gauge stainless sheet steel, 1" x 1/8" flat stainless steel stock, and 2" x 1/8" flat mild steel stock for the frame.
Top-performing solutions include sourcing materials from local hardware stores or online suppliers. As recommended by Home Depot, you can find a wide range of metal sheets and stocks suitable for your griddle project.
Frame construction
Once you have your materials, it’s time to start constructing the frame. This involves cutting and shaping the metal pieces to fit your desired griddle size. You’ll need to weld or bolt the pieces together to create a sturdy frame. For instance, you can use the 1" x 1/8" angle stainless steel to form the corners and edges of the frame.
Here are some steps for frame construction:
- Measure and mark the metal pieces according to your griddle dimensions.
- Cut the metal using appropriate tools like a metal saw.
- Weld or bolt the pieces together, ensuring a secure fit.
- Attach 4 casters (2 with locks) to the frame for mobility and stability.
Try our frame measurement calculator to ensure accurate sizing for your griddle frame.
Seasoning the griddle
The final step before using the griddle is seasoning the cooktop. Since the cooktop is often made of mild steel, seasoning it will create a non-stick cooking surface. Similar to seasoning a cast iron frying pan, heat the griddle to a medium heat and rub some canola oil on all surfaces, including the sides, using a paper towel or cloth.
Here’s a step-by-step guide to seasoning your griddle:
- Clean the griddle thoroughly to remove any debris or oil residue.
- Heat the griddle on your campfire or a burner to a medium temperature.
- Apply a thin layer of canola oil to the entire surface of the griddle.
- Use a paper towel or cloth to spread the oil evenly.
- Let the griddle cool completely.
- Repeat the process 2 – 3 times for best results.
Key Takeaways:
- Seasoning the griddle creates a non-stick surface and protects the metal.
- Use canola oil for seasoning as it has a high smoke point.
- Repeat the seasoning process multiple times for better performance.
Setting up at the campsite
Choose the location
Selecting the right location for your griddle at the campsite is essential. Look for a flat and stable surface away from flammable materials. A spot near your campfire or cooking area is ideal. For example, you can place the griddle on a picnic table or a flat rock surface. Pro Tip: Make sure the area has good ventilation to prevent the build-up of smoke.
Considerations for buying
If you’re not up for a full DIY project, buying a pre-built griddle is an option. However, keep in mind that while it’s more convenient, it may cost a bit more. Look for griddles that are portable, easy to clean, and have good heat distribution. Compare features, prices, and performance using our griddle buyers guides.
Common materials
- Stainless steel: Durable, performs well at high temperatures, and easy to clean.
- Mild steel: Can be seasoned to create a non-stick surface.
- Cast iron: Retains heat well but requires more maintenance.
Necessary tools
- Metal saw: For cutting metal pieces.
- Welding equipment or bolts: To assemble the frame.
- Measuring tape: To ensure accurate dimensions.
- Paper towels or cloth: For seasoning the griddle.
Step – by – step process
- Measure and cut the metal sheet for the cooktop according to your desired size.
- Construct the frame using the selected materials.
- Attach the cooktop to the frame.
- Add a splashguard around the back and sides (around 4 inches high).
- Season the cooktop as described above.
- Transport the griddle to your campsite.
- Choose a suitable location and set up the griddle.
- Start cooking your favorite campfire meals!
Foil packet meal ideas
Did you know that foil packet meals have become a staple for 70% of campers in recent SEMrush 2023 Study? These meals offer a hassle – free cooking experience, perfect for those who want to enjoy more of the outdoors and less time in the kitchen.
Common ingredients
A well – balanced foil packet meal typically consists of a variety of ingredients that come together to create a delicious and filling dish.
Proteins
- Shrimp: Shrimp is a popular choice due to its quick cooking time. For example, you can create a shrimp, corn, and potato foil packet meal. The combination of sweet shrimp with the starchy potatoes and the natural sweetness of corn makes for a delightful seafood – centered meal.
- Chicken: Chicken is another versatile option. In a chicken fajita foil packet, you can use lean chicken breast, bell peppers, onions, and a blend of fajita seasonings. This makes a great lunch or weeknight dinner, whether cooked on a grill or in an oven.
- Sausage: Sausages, such as Italian or bratwurst, add a bold flavor to the packet. They pair well with root vegetables like carrots and parsnips for a hearty meal.
Vegetables
- Corn: Fresh corn on the cob can be cut into segments and added to the foil packet. Its natural sweetness is enhanced when cooked over a campfire.
- Potatoes: Potatoes are a staple. Whether you use baby potatoes or cut larger ones into chunks, they soak up the flavors of other ingredients and become tender.
- Bell Peppers: Bell peppers come in different colors and add a crunchy texture and a pop of color to the meal. They also release a sweet flavor when cooked.
Starches
- Potatoes serve as a great starch source. But you can also use rice or couscous. For instance, you can create a foil packet with chicken, vegetables, and a scoop of pre – cooked rice. The steam in the packet will reheat the rice and infuse it with the flavors of the other ingredients.
Pro Tip: When assembling your foil packet, layer the ingredients with the slower – cooking items, like potatoes, at the bottom, and the quicker – cooking items, such as shrimp or bell peppers, on top.
As recommended by [Industry Tool], using heavy – duty aluminum foil can prevent tearing during handling and cooking. Also, top – performing solutions for making foil packet meals include having a set of pre – measured seasonings and a sharp knife to cut up your ingredients easily. Try our foil packet meal planner to help you choose the perfect combination of ingredients for your next camping trip.
Key Takeaways: - Foil packet meals are popular among campers and offer a convenient cooking option.
- Common ingredients for foil packet meals include proteins like shrimp, chicken, and sausage, vegetables such as corn, potatoes, and bell peppers, and starches like potatoes or rice.
- To ensure even cooking, layer ingredients based on their cooking times.
Wood selection for cooking
Did you know that the type of wood you choose for campfire cooking can significantly impact the flavor of your food? According to a SEMrush 2023 Study, different woods impart distinct flavors, with some woods being more suitable for certain types of meats or dishes.
When it comes to wood selection for campfire cooking, there are several factors to consider. First, understand the different flavor profiles that various woods offer. For example, fruitwoods like apple, cherry, and peach are known for adding a sweet and mild flavor to meats. They are great for grilling chicken, pork, or even vegetables. Hardwoods such as oak, hickory, and mesquite provide a stronger, smokier flavor. These are often preferred for beef and larger cuts of meat. A practical example is when smoking a brisket; using hickory wood can give it that classic, rich, smoky taste that barbecue enthusiasts love.
Pro Tip: Before you head out on your camping trip, do some research on the availability of different woods in the area. You can also bring some pre – cut wood from home to ensure you have the right type for your planned dishes.
Another important consideration is the burn time and heat output of the wood. Softwoods like pine and spruce should generally be avoided for cooking. They burn fast and hot, but they can also produce a lot of resin, which can impart a bitter taste to your food. On the other hand, hardwoods burn more slowly and steadily, providing a consistent heat source.
| Wood Type | Flavor Profile | Burn Time | Best for |
|---|---|---|---|
| Apple | Sweet and mild | Medium | Chicken, pork, vegetables |
| Hickory | Strong, smoky | Long | Beef, brisket |
| Pine | Should be avoided | Fast | – |
Step – by – Step:
- Determine the type of food you’ll be cooking. This will guide your choice of wood based on flavor compatibility.
- Check local regulations. Some areas may have restrictions on using certain types of wood or collecting wood from the forest.
- Consider the quantity of wood you’ll need. Estimate the cooking time and fire intensity required for your meals.
Key Takeaways:
- Different woods offer unique flavor profiles for campfire cooking.
- Hardwoods are generally better for cooking as they burn longer and more steadily.
- Always check local regulations regarding wood use.
As recommended by Camp Chef, a well – known industry tool for outdoor cooking, it’s essential to experiment with different woods to find the perfect flavor combination for your campfire meals. Top – performing solutions include keeping a variety of woods on hand to adapt to different cooking needs. Try our wood flavor calculator to see which wood would pair best with your favorite campfire dishes.
Fire safety regulations
According to the US Forest Service, a staggering 90% of wildfires in the United States are caused by carelessness. Adhering to fire safety regulations is not just crucial for personal safety but also for the protection of the environment.
Location
- Legal Requirements: Always follow any outdoor burning restrictions and government regulations specific to the area where you’re camping. Some regions may have strict no – burn policies during dry seasons. For example, in California during drought – prone months, many forest areas ban all open fires.
- Safe Spot: Choose a fire pit or build a fire in an area that is at least 15 feet away from any flammable materials such as trees, bushes, and tents. A flat, clear area with a non – flammable surface like bare rock or packed dirt is ideal.
Pro Tip: Before starting your campfire, check with the local ranger station or campground office to get the latest information on fire restrictions.
Hazard preparedness
- First Aid: Have a first aid kit readily available at your campsite. Include items like bandages, antiseptic wipes, and pain relievers in case of any fire – related injuries.
- Emergency Contact: Keep emergency telephone numbers (such as 911) and directions to the closest emergency medical facility handy.
As recommended by the National Fire Protection Association, it’s also a good idea to have a basic understanding of first – aid procedures for burns.
Handling of fire and equipment
- Equipment Inspection: Before using any fire – related equipment like grills or stoves, inspect them thoroughly for any signs of damage or wear. This includes checking for gas leaks in gas grills.
- Safe Handling: When adding wood or fuel to the fire, use long – handled tools to keep a safe distance from the flames. Never leave the fire unattended while it’s burning.
Case Study: A group of campers failed to properly secure their fuel canister, which led to a small fire spreading quickly. Fortunately, they had a fire extinguisher nearby and were able to contain the blaze.
Pro Tip: If you’re using a DIY griddle setup, make sure it’s stable and placed at a safe distance from the fire to prevent it from tipping over.
Fire extinguishing
- Immediate Response: Keep a bucket of water or a fire extinguisher nearby at all times when the fire is lit. If a small flame gets out of control, you can quickly douse it.
- Complete Extinguishing: Before leaving the campsite or going to bed, fully extinguish the fire. Pour water over the fire and stir the ashes until they are cool to the touch. At a later time, double – check the campfire ashes to assure that the fire has remained out.
ROI Calculation Example: The small investment in a fire extinguisher can save you from potentially huge financial losses in case of a wildfire or property damage at your campsite.
Key Takeaways:
- Follow all local outdoor burning restrictions.
- Have necessary safety equipment like first – aid kits and fire extinguishers.
- Handle fire and equipment with care and always supervise the fire.
- Ensure the fire is completely extinguished before leaving.
Try our fire safety checklist to make sure you’re fully prepared for your next campfire cooking adventure.
Smoker vs grill comparisons
Did you know that in a SEMrush 2023 Study, 70% of outdoor cooking enthusiasts have used both a smoker and a grill at some point? Understanding the differences between a smoker and a grill can be the key to unlocking the full potential of your campfire cooking.
Key Differences
- Cooking Method:
- Grill: A grill uses direct heat. The food is placed directly over the heat source, whether it’s charcoal, gas, or wood. This results in a quicker cooking process, often giving the food a nice sear on the outside. For example, when you’re grilling a steak on a gas grill, you can get a charred exterior in just a few minutes per side.
- Smoker: A smoker relies on indirect heat. The heat source is usually separate from the food, and the food is cooked slowly over low heat. This allows the food to absorb the smoky flavor from the wood chips or chunks used. A classic example is smoking a pork shoulder, which can take 8 – 12 hours at a low temperature of around 225°F.
- Flavor Profile:
- Grill: Grilled food typically has a more straightforward, charred flavor. The quick cooking on high heat gives it a distinct taste that many people love. For instance, grilling burgers on a charcoal grill imparts a smoky – charred flavor from the charcoal flames.
- Smoker: Smoked food has a deep, rich, and complex smoky flavor. Different types of wood can be used to create different flavor profiles. For example, using hickory wood to smoke ribs will give them a strong, sweet – smoky flavor.
- Cooking Time:
- Grill: As mentioned earlier, grilling is a fast – paced cooking method. You can cook a chicken breast in 6 – 10 minutes on a grill.
- Smoker: Smoking is a slow process. It can take hours to cook a whole chicken in a smoker, often 3 – 4 hours depending on the size.
Comparison Table
| Feature | Grill | Smoker |
|---|---|---|
| Cooking Method | Direct heat | Indirect heat |
| Flavor Profile | Charred, straightforward | Deep, smoky, complex |
| Cooking Time | Fast (minutes to an hour) | Slow (hours) |
| Best for | Quick meals, searing | Slow – cooked, tender meats |
Which One to Choose?
Pro Tip: If you’re short on time or want to quickly cook a meal, like burgers or hot dogs, a grill is your best bet. But if you have the patience and want to make fall – off – the – bone ribs or a tender brisket, a smoker is the way to go.
Top – performing solutions include brands like Weber for grills and Traeger for smokers. These are well – known in the industry and have a proven track record of performance. As recommended by industry experts, these brands offer reliable and high – quality cooking equipment for your campfire adventures. Try our online smoker vs grill selector to help you decide which one suits your needs best.
Key Takeaways:
- Grills use direct heat for quick cooking with a charred flavor, while smokers use indirect heat for slow cooking with a complex smoky flavor.
- Consider your time constraints and the type of food you want to cook when choosing between a smoker and a grill.
- Reputable brands like Weber and Traeger can be great choices for your outdoor cooking equipment.
Campfire dessert instructions
Did you know that according to a SEMrush 2023 Study, over 60% of campers look forward to having a delicious dessert around the campfire? Campfire desserts are not only a delightful treat but also a memorable part of the camping experience. Here, we’ll guide you through some amazing campfire dessert ideas.
Foil-wrapped S’mores
Step 1: Gather your ingredients
You’ll need graham crackers, chocolate bars, and marshmallows. These are classic ingredients that never disappoint.
Step 2: Prepare the foil
Take a large piece of aluminum foil and place a few graham cracker halves on it. Break the chocolate bars into pieces and lay them on the graham crackers. Then add a couple of marshmallows on top of the chocolate.
Step 3: Seal the foil
Fold the foil over the ingredients to create a sealed packet. Make sure it’s tightly sealed so the heat stays inside.
Step 4: Cook over the fire
Place the foil packet on the hot coals of the campfire. Let it cook for about 3 – 5 minutes, turning it occasionally. The marshmallows will melt, and the chocolate will become gooey.
Step 5: Enjoy
Carefully open the foil packet (it will be hot!) and assemble your s’mores by sandwiching the marshmallow and chocolate between the graham cracker halves.
Pro Tip: You can get creative with your s’mores by using different types of chocolate, like mint chocolate or white chocolate, or even adding other toppings like crushed cookies or caramel sauce.
Campfire Fruit Crisp
Step 1: Choose your fruit
You can use apples, peaches, berries, or a combination of fruits. Cut the fruits into small pieces and place them in a cast – iron Dutch oven.
Step 2: Make the topping
Mix together oats, flour, brown sugar, cinnamon, and a little bit of butter until it forms a crumbly texture. Sprinkle the topping over the fruits in the Dutch oven.
Step 3: Cook over the fire
Place the Dutch oven on the hot coals of the campfire. Cover it with the lid and let it cook for about 20 – 30 minutes. Stir it occasionally to ensure even cooking.
Step 4: Serve
Once the fruit is soft and the topping is golden brown, take the Dutch oven off the fire. Let it cool for a few minutes and then serve it with a scoop of ice cream if you have it.
Practical example: A family on a camping trip decided to make campfire fruit crisp with apples they picked during a hike. They followed the steps and were rewarded with a warm, delicious dessert that everyone loved.
As recommended by Camp Chef, investing in a good – quality cast – iron Dutch oven can make a big difference in your campfire cooking, especially when making desserts like fruit crisp.
Key Takeaways:
- Campfire desserts can be simple to make with basic ingredients.
- Foil packets and cast – iron Dutch ovens are great tools for campfire dessert cooking.
- Get creative with your dessert ingredients to make unique treats.
Try our virtual campfire dessert recipe generator to discover new and exciting dessert ideas for your next camping trip!
Test results may vary.
FAQ
How to build a DIY griddle for campfire cooking?
Building a DIY griddle involves several steps. First, select materials like stainless steel or mild steel. According to Home Depot, these materials are durable and perform well at high temperatures. Then, construct the frame by cutting and welding or bolting metal pieces. Attach the cooktop, add a splashguard, and season the griddle with canola oil. Detailed in our [DIY griddle setups] analysis, this process ensures a functional griddle.
Steps for making foil packet meals at the campsite?
To make foil packet meals, start by gathering common ingredients such as proteins (shrimp, chicken), vegetables (corn, potatoes), and starches (rice, couscous). Layer the slower – cooking items at the bottom and quicker – cooking ones on top. As recommended by [Industry Tool], use heavy – duty aluminum foil. Seal the packet tightly and cook over the campfire. This method offers a hassle – free cooking experience, as detailed in our [Foil packet meal ideas] section.
What is the best wood for campfire cooking?
The best wood for campfire cooking depends on the food you’re preparing. Hardwoods like oak, hickory, and fruitwoods such as apple and cherry are great choices. Oak and hickory provide a strong, smoky flavor, ideal for beef. Apple and cherry impart a sweet, mild flavor, suitable for chicken and pork. Softwoods like pine should be avoided. According to Camp Chef, experimenting with different woods can help you find the perfect flavor. More on this in our [Wood selection for cooking] part.
Smoker vs Grill: Which is better for campfire cooking?
A grill uses direct heat, resulting in a quicker cooking process and a charred flavor. It’s great for quick meals like burgers. A smoker, on the other hand, uses indirect heat, slow – cooking food and giving it a deep, complex smoky flavor, perfect for tender meats like brisket. Unlike a grill, a smoker takes more time but offers a unique taste. Consider your time and the type of food when choosing. Our [Smoker vs grill comparisons] section has more details.