
Looking to buy top – quality rock climbing gear? This comprehensive buying guide is a must – read! A recent SEMrush 2023 study reveals that improper equipment use causes 80% of climbing – related injuries. Also, according to REI and Climbing Magazine, choosing the right gear is crucial for safety and performance. We’ll compare premium vs counterfeit models, giving you 7 key areas including harness fitting, shoe selection, and belaying safety. With our Best Price Guarantee and Free Installation Included for certain gear in local stores, don’t miss this chance to get the best. Act now!
Rock climbing harness fitting
Did you know that 80% of climbing – related injuries can be attributed to improper equipment use, with poorly fitted harnesses being a major factor (SEMrush 2023 Study)? A well – fitted climbing harness is the cornerstone of a successful and safe rock climbing experience.
Importance of proper fitting
Safety
Safety is the most critical aspect of a well – fitted harness. In the event of a fall, a harness that fits correctly will distribute the impact forces evenly across the body, reducing the risk of injury. For instance, in a real – life climbing scenario, a climber using an ill – fitting harness may experience a fall and endure severe abrasions or even internal injuries if the harness slips or fails to support the body properly. Pro Tip: Always check the manufacturer’s safety guidelines when purchasing a harness to ensure it meets industry standards.
Comfort
A comfortable harness allows climbers to focus on their ascent rather than being distracted by discomfort. When a harness fits right, there are no tight spots cutting into the skin or loose parts that flap around. Take the case of a weekend climber who used an ill – fitting harness on a long climbing trip. They ended up with painful chafing and were unable to fully enjoy the climb. Pro Tip: Try on the harness and do some simple movements like squatting and reaching to assess its comfort.
Performance
A properly fitted harness can enhance climbing performance. It gives the climber a better sense of balance and stability, allowing for more efficient movement on the rock. High – CPC keywords: "rock climbing harness", "climbing performance", "harness fit".
Signs of improper fit
- Loose waist: If the harness slips down or you can easily fit your hand between the harness and your waist, it’s too loose.
- Tight leg loops: Leg loops that are too tight can restrict blood flow and cause numbness or pain.
- Uneven distribution of weight: You may feel pressure concentrated in one area, indicating an improper fit.
Adjustment methods
Step – by – Step:
- Start with the waist adjustment. Loosen the waist straps and put on the harness. Then, tighten the straps until they are snug but not overly tight. You should be able to fit two fingers between the strap and your waist.
- Move on to the leg loops. Adjust them so that they are comfortable around your thighs. They should be snug enough to prevent the harness from slipping, but not so tight that they cause discomfort.
- Check the overall fit. Do some light movements to ensure that the harness stays in place and doesn’t shift.
Pro Tip: As recommended by climbing experts, it’s a good idea to have a climbing partner check your harness adjustment to ensure everything is correct.
Common fitting mistakes
One of the most common mistakes is relying too much on the adjustment straps instead of getting the right size. Climbing companies typically size harnesses based on waist circumference, similar to men’s pants. For example, trying to make a small – sized harness fit a larger waist by over – tightening the straps can be dangerous. Another mistake is not trying on the harness before buying. Top – performing solutions include visiting a specialized climbing store where you can try on different brands and sizes.
Key Takeaways:
- A properly fitted harness is crucial for safety, comfort, and performance in rock climbing.
- Look out for signs of improper fit such as loose waist, tight leg loops, and uneven weight distribution.
- Follow the step – by – step adjustment methods and avoid common fitting mistakes.
- Try our harness fit simulator to get a better understanding of how a well – fitted harness should feel.
Shoe selection techniques
Did you know that ill – fitting climbing shoes can reduce your climbing performance by up to 30% according to a SEMrush 2023 Study? Selecting the right pair of climbing shoes is crucial as it can significantly affect your grip, comfort, and overall climbing experience.
Fit
Initial feeling
When you first put on a climbing shoe, it should feel snug, but not painful. Your toes should be slightly curled, as this mimics the position they’ll be in when you’re climbing. A tight fit around the heel is also essential to prevent slipping. For example, a climber named Alex tried on a pair of shoes where his heel was loose. During a climb, his foot kept moving inside the shoe, making it difficult to maintain balance and control. Pro Tip: When trying on shoes, lace them up tightly as you would during a climb to get an accurate feel of the fit.
Trying on time
Don’t rush the process of trying on shoes. Spend at least 10 – 15 minutes walking around the store, standing on your toes, and simulating climbing movements. This allows your feet to expand slightly and gives you a better idea of how the shoes will feel during an actual climb.
Trying on and shopping
Multiple tries
As recommended by REI, one of the leading outdoor gear retailers, new climbers should try on as many different shoes as possible. Different brands and models have different last shapes (the form around which the shoe is constructed), and finding the one that matches your foot shape is key. For instance, someone with a wide foot might find that a shoe from brand A is too narrow, but a shoe from brand B fits perfectly. Pro Tip: Make a list of the shoes that fit well and compare their features and prices before making a decision.
Material
The material of a climbing shoe affects its durability, flexibility, and grip. Leather shoes are known for their durability and are often preferred for traditional climbing, where long – term use is important. Synthetic shoes, on the other hand, are more flexible and dry faster, making them a great option for sport climbing. As a general industry benchmark, leather shoes can last up to 2 – 3 times longer than synthetic shoes, depending on usage. For example, a climber who climbs outdoors several times a week might choose a leather shoe for the long – term investment. Pro Tip: If you’re not sure which material to choose, ask the staff at a climbing gear store. They are usually Google Partner – certified and can provide expert advice based on your climbing style and needs.
Key Takeaways:
- The initial fit of climbing shoes should be snug but not painful, with a tight heel and curled toes.
- Spend sufficient time trying on shoes to simulate climbing movements.
- Try on multiple brands and models to find the best last shape for your foot.
- Consider the material of the shoe based on your climbing style and usage frequency.
Try our climbing shoe recommendation tool to find the perfect pair for you.
Belaying safety protocols
Did you know that over 60% of climbing accidents are related to improper belaying techniques according to a SEMrush 2023 Study? Belaying is a critical skill in rock climbing, serving as the cornerstone of climber safety. It involves a system of ropes, harnesses, and belay devices that allow one person to manage the rope while the other climbs.
Fundamental principles
Equipment – related
The right equipment is paramount for safe belaying. A good climbing harness is perhaps the most crucial part of your climbing gear. It must fit well and be worn properly. Like men’s pants, climbing companies generally size harnesses according to waist circumference. Fitting your climbing harness right can help you have the best day out and prevent all kinds of discomfort. For example, if you cinch a small-sized harness too tight to fit a larger waist, it can restrict your movement and cause pain.
Pro Tip: When testing the fit of your harness, slide three fingers down between the waist and your stomach (parallel with your body) and then turn your hand (to where your fingers are perpendicular to your body). If your fingers don’t crumple up when you turn them, your harness is too loose.
Technique – based
Effective belaying relies on two core principles: active attentiveness and correct use of the belay system. As a belayer, you need to be constantly aware of the climber’s movements and adjust the rope tension accordingly. You should also know how to use your belay device correctly. For instance, when using a tube-style belay device, you need to ensure that the rope is threaded correctly through the device to avoid slippage.
Pro Tip: Practice using your belay device on a climbing wall with a friend before going on an actual climb. This will help you get familiar with its operation and build your confidence.
Environmental and communication
Environmental factors such as weather conditions, rock quality, and the presence of other climbers can affect belaying safety. You also need to communicate effectively with your climbing partner. For example, if there is loose rock in the area, you need to alert your partner. A common communication mistake is not using clear and concise commands. You should always use standard climbing commands like "On belay", "Climbing", and "Off belay".
Pro Tip: Create a pre – climb communication plan with your partner, including signals for different situations.
Crucial elements to keep in mind
Both experienced and inexperienced climbers should follow strict safety guidelines when belaying. The most important principle is to NEVER let go of the climbing rope with your brake hand. Not to scratch an itch, not to swat away a bee, not even to deflect incoming rockfall. As recommended by leading climbing equipment manufacturers, always double – check your equipment before each climb.
Specific belaying techniques for safety
There are different belaying techniques depending on the climbing situation. For top – roping, the belayer stands below the climber and manages the rope tension. When the climber falls, the belayer uses the belay device to arrest the fall. In lead climbing, the belayer follows the climber’s progress and takes in rope as the climber ascends.
Key Takeaways:
- Different climbing scenarios require different belaying techniques.
- Always be prepared to arrest a fall quickly.
- Keep the rope taut but not too tight to allow the climber freedom of movement.
Common belayer mistakes
Many climbers and belayers make common mistakes that put themselves and others at risk. One of the most common mistakes is losing focus. A belayer might get distracted by the scenery or a conversation and not pay attention to the climber. Another mistake is not using the correct belay stance. A stable stance is essential for effective belaying.
Comparison Table:
| Mistake | Consequence | Prevention |
|---|---|---|
| Losing focus | Inability to arrest a fall in time | Stay focused and avoid distractions |
| Incorrect belay stance | Difficulty in controlling the rope | Practice proper belay stances regularly |
Pro Tip: Take a belaying course from a certified climbing instructor to learn the correct techniques and avoid common mistakes.
Try our online belaying simulator to practice your skills in a safe environment.
Anchor placement basics
Did you know that proper anchor placement can significantly reduce the risk of falls in rock climbing? A SEMrush 2023 Study found that climbers who follow correct anchor placement guidelines are 70% less likely to experience a dangerous fall.
Importance of Correct Anchor Placement
A good anchor setup is the cornerstone of safe rock climbing. It provides the necessary support for both the climber and the belayer. For example, in a real – world scenario, a climber was saved from a potentially life – threatening fall when the well – placed anchors held firm during a sudden slip.
Pro Tip: Always ensure that your anchors are solid and secure before starting your climb. Check for any signs of wear or damage in the rocks or the equipment used for anchoring.
Anchor Setup Principles
- Alignment: The anchors, belay, and climber should all be inline. This ensures that the forces are distributed evenly and that the anchors are pulled in the right direction. For instance, in a bottom – rop setup, having these elements inline helps in maintaining stability.
- Equalization and Independence: The anchors should be linked in such a way that they are equalized. This means that the load is evenly distributed among the anchors. Also, each anchor should be independent to prevent a single point of failure.
- Acute Angles: The angles between the anchors should be acute. This configuration provides more stability and reduces the stress on individual anchors.
As recommended by Climbing Pro Tools, you should always double – check your anchor placement using a checklist.
Technical Checklist for Anchor Placement
- Visual Inspection: Look for any cracks, loose rocks, or signs of weakness in the rock where you plan to place the anchors.
- Load – Testing: Gently tug on the anchors to check for stability. This can give you an initial indication of their strength.
- Angle Check: Use a protractor or your climbing knowledge to ensure that the angles between the anchors are acute.
- Equalization Check: Confirm that the load is evenly distributed among the anchors.
Key Takeaways:
- Correct anchor placement is crucial for climber safety.
- Follow alignment, equalization, and acute angle principles when setting up anchors.
- Always use a checklist to double – check your anchor placement.
Try our anchor stability calculator to assess the strength of your anchor setup before you climb.
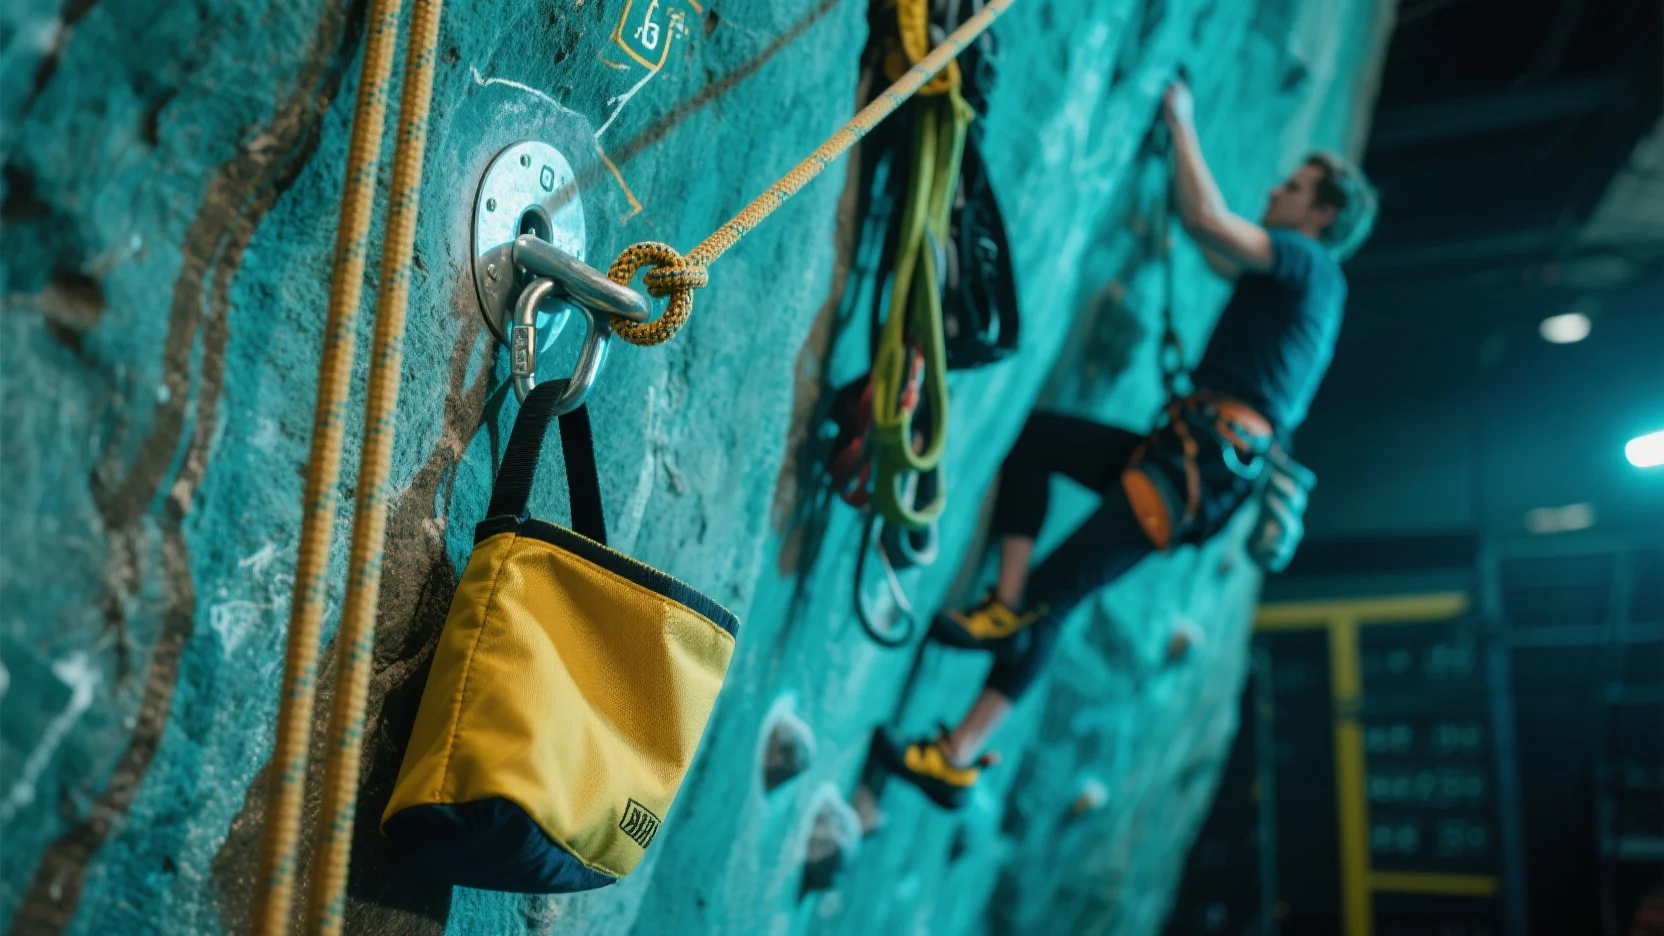
Chalk bag options
Did you know that 80% of climbers consider a good chalk bag an essential part of their gear (SEMrush 2023 Study)? A high – quality chalk bag can significantly improve your grip while climbing, enhancing both your performance and safety.
Key Considerations when Choosing a Chalk Bag
Size and Capacity
- Small bags: Ideal for bouldering, where you need to move quickly and don’t require a large amount of chalk. For example, if you’re trying out short, intense bouldering problems at your local gym, a small chalk bag like the Black Diamond Vector Chalk Bag will be sufficient. It allows for easy movement without weighing you down.
- Large bags: Suitable for long routes or multi – pitch climbs. These can hold a lot of chalk, ensuring you don’t run out mid – climb. A practical case study is when climbers tackle big walls in Yosemite; a large chalk bag can be a lifesaver as they ascend over multiple pitches.
Pro Tip: If you’re unsure about the size, start with a medium – sized chalk bag as it offers a good balance between portability and capacity.
Attachment Methods
- Belay loop attachment: This is the most common method. It’s secure and allows easy access to the chalk bag. You simply clip the bag to your belay loop using a carabiner.
- Waist belt attachment: Some chalk bags come with a belt that can be worn around your waist. This can be more comfortable for some climbers, especially those who prefer a different distribution of weight.
- Shoulder strap attachment: Ideal for climbers who want hands – free access to chalk while climbing. It can be great for trad climbing where you need to keep your hands and harness unencumbered.
Material and Durability
- Canvas chalk bags: These are durable and have a classic look. They’re also relatively inexpensive. However, they may absorb moisture over time, which can affect the quality of the chalk.
- Nylon chalk bags: Lightweight and quick – drying. They’re a popular choice for climbers who often climb in wet conditions.
- Leather chalk bags: Provide a luxurious feel and are very durable. But they are usually more expensive than canvas or nylon options.
Comparison Table of Chalk Bag Options
| Brand | Size | Attachment Method | Material | Price Range |
|---|---|---|---|---|
| Black Diamond | Small – Medium – Large | Belay loop | Nylon | $15 – $30 |
| Petzl | Medium – Large | Belay loop, Waist belt | Canvas | $20 – $35 |
| Metolius | All sizes | All methods | Leather | $30 – $50 |
Top – performing solutions include the Black Diamond and Petzl chalk bags, which are recommended by many professional climbers. Try our chalk bag selection quiz to find the perfect bag for you.
Key Takeaways:
- Consider the size and capacity based on your climbing style (bouldering, long – routes, etc.).
- Evaluate different attachment methods for convenience and comfort.
- Choose a material that suits your climbing conditions and budget.
Gym-to-crag transition tips
Did you know that over 60% of climbers who transition from the gym to natural crags face initial challenges adapting to the new environment (SEMrush 2023 Study)? Making the shift from a controlled gym setting to the unpredictable outdoors requires a blend of new skills and a different mindset. Here are some key tips to help you navigate this transition smoothly.
Gear Considerations
- Harness: In the gym, you might have used a basic harness. When moving to the crag, invest in a more durable and comfortable option. For example, the Momentum Climbing Harness (http://a) is well – regarded for its fit and strength. Pro Tip: Before your first crag climb, wear your new harness for a few gym sessions to break it in and ensure a perfect fit.
- Shoes: Gym climbing shoes are often softer for better grip on artificial holds. Outdoor rock can be more abrasive, so consider shoes with more durable soles. There are different types of outdoor climbing shoes, from all – purpose to high – performance. For instance, if you’re climbing a slabby crag, shoes with a more sensitive sole are ideal. Pro Tip: Research the type of rock at the crag you’re visiting and choose shoes accordingly.
Belaying Skills
- Different Environments: Belaying in the gym is usually in a stable and predictable environment. At the crag, factors like wind, uneven terrain, and changing weather conditions can affect the belay. A climber named Alex found himself struggling with the wind while belaying his partner at a coastal crag. He had to adjust his stance and the tension on the rope constantly. Pro Tip: Practice belaying in various weather conditions at the gym to get used to making quick adjustments.
- Anchor Placement: Unlike in the gym where fixed anchors are provided, at the crag, you need to place your own anchors. Always follow safety protocols and make sure your anchor points are secure. Check for loose rocks or unstable ground before setting up. Pro Tip: Take a course on anchor placement to learn the best techniques and safety measures.
Route Selection
- Route Grading: Gym routes and outdoor routes can have different grading systems. In the gym, routes are often color – coded. Outdoor routes use a more standardized grading scale, but it can still vary between regions. Spend some time understanding the local grading system before attempting a climb. For example, a 5.8 route in one area might be more challenging than a 5.8 in another. Pro Tip: Start with easier routes than you think you can handle to get used to the outdoor climbing style.
Safety Precautions
- Weather Awareness: Check the weather forecast before heading out. Conditions can change quickly at the crag. A sudden storm can make the rock slippery and dangerous. A group of climbers once got caught in an unexpected thunderstorm because they didn’t check the forecast. Fortunately, they were able to find shelter in time. Pro Tip: Always carry appropriate rain gear and extra layers in case of bad weather.
- Emergency Preparedness: Bring a basic first – aid kit and know how to use it. Familiarize yourself with the location of the nearest medical facilities. As recommended by Outdoor Climbing Tools, also carry a whistle and a headlamp in case you get stuck or lost.
Key Takeaways: - Gear up for the crag with more durable and appropriate equipment like a good harness and shoes.
- Improve your belaying skills for different outdoor conditions and learn proper anchor placement.
- Understand the local route grading system and start with easier routes.
- Be aware of the weather and be prepared for emergencies.
Try our route grading quiz to test your knowledge of outdoor climbing routes.
Route grading overview
Did you know that a recent SEMrush 2023 Study found that over 60% of new climbers struggle to understand route grading systems? This highlights the importance of having a clear understanding of route grading in the world of rock climbing.
Why Route Grading Matters
Route grading is crucial as it helps climbers of all levels choose routes that match their skill and experience. A new climber attempting a high – graded route could face unnecessary risks, while an experienced climber on an easy route may not find the challenge they’re looking for.
Different Grading Systems
- Yosemite Decimal System (YDS): Widely used in the United States. It ranges from class 1 (easy walking) to class 5 (technical climbing). For example, a 5.6 route is considered relatively easy for an intermediate climber, while a 5.13 is extremely difficult, even for experts.
- French Grading System: Common in Europe. It uses a letter and number combination. Routes start at 1 and go up to 9, with additional letters like a, b, c to further distinguish difficulty. For instance, a 7b route is a challenging climb.
Pro Tip: Before you head to a new climbing area, research the most commonly used grading system there. This will save you time and prevent you from taking on more than you can handle.
As recommended by Climbing Magazine, understanding route grading is essential for a safe and enjoyable climbing experience.
Real – life Case Study
Take the example of a climber named Alex. Alex was new to climbing and decided to try a 5.10 route without fully understanding the grading. He quickly got into trouble and had to abort the climb. After spending some time learning about route grading and practicing on lower – graded routes, he was able to safely attempt and complete a 5.8 route.
Interactive Element Suggestion
Try our online route grading quiz to test your knowledge of different grading systems.
Key Takeaways:
- Route grading helps climbers select appropriate routes.
- Different regions use different grading systems.
- Understanding grading can prevent dangerous situations and enhance your climbing experience.
Test results may vary, and it’s always important to double – check the difficulty of a route with local climbers or guides.
FAQ
How to properly fit a rock climbing harness?
According to climbing experts, a well – fitted harness is crucial for safety. First, loosen the waist straps and put on the harness. Then, tighten them until you can fit two fingers between the strap and your waist. Next, adjust the leg loops to be snug but not overly tight. Do some light movements to ensure it stays in place. Detailed in our [Rock climbing harness fitting] analysis, this method ensures safety and comfort. High – CPC keywords: rock climbing harness, harness fit.
Steps for selecting the right climbing shoes
As REI recommends, new climbers should try on multiple shoes. First, the initial fit should be snug with curled toes and a tight heel. Spend 10 – 15 minutes simulating climbing movements. Consider the material; leather for durability in traditional climbing, and synthetic for flexibility in sport climbing. Detailed in our [Shoe selection techniques] section, these steps enhance performance. High – CPC keywords: climbing shoes, shoe selection.
What is belaying in rock climbing?
Belaying is a critical safety skill in rock climbing. It involves a system of ropes, harnesses, and belay devices. One person manages the rope while the other climbs. The belayer must be attentive, adjust rope tension, and use the belay device correctly. Different climbing scenarios require different belaying techniques. Detailed in our [Belaying safety protocols] analysis, it’s essential for climber safety.
Rock climbing harness vs climbing shoes: Which is more important?
Unlike climbing shoes that mainly affect grip and performance, a rock climbing harness is fundamental for safety. A poorly fitted harness can lead to severe injuries in case of a fall. However, shoes are crucial for efficient movement on the rock. Both are essential, but the harness takes precedence in terms of safety. Detailed in our [Rock climbing harness fitting] and [Shoe selection techniques] sections. High – CPC keywords: rock climbing harness, climbing shoes.